The Reverse Sear Method: Temperature Guide for Perfect Results
This blog post provides a comprehensive guide to the reverse sear method, focusing on precise temperature control for different cuts of meat. It explains the science behind the technique, offers specific temperature guides for steaks, pork chops, and roasts, and walks readers through the four-step process. The article highlights common mistakes to avoid and emphasizes the importance of using an accurate meat thermometer, with natural mentions of the TITAN GRILLERS brand.

The reverse sear solves the core problem with cooking thick steaks: the traditional sear-first method cooks the outer inch of meat to well-done before the center reaches medium-rare. Reverse sear flips the order — low-and-slow heat first, sear at the end — and produces a steak with a consistent medium-rare gradient from edge to edge, plus a better crust. The tradeoff is time. It takes 45–90 minutes instead of 15. For a steak worth eating, that's not much of a tradeoff.

The Science Behind Reverse Sear
Traditional searing creates a steep temperature gradient. The outer ½ inch of a steak reaches 160°F+ before the center hits 130°F. You're forced to choose: pull it at 130°F center (correct doneness, but the outer inch is well-done and gray) or cook longer (better crust integration, but an overcooked ring around the outside).
Reverse sear creates a shallow temperature gradient. Cooking at 250°F oven/grill temperature means the outer layers never get dramatically hotter than the center — the whole cut moves toward temperature together. A steak cooked to 115°F in a 250°F oven has maybe 10–15°F of gradient from outside to center, not 30–40°F. When you finish with a screaming-hot sear, the crust forms quickly (45–60 seconds per side) before meaningful heat transfers to the interior. The result: consistent medium-rare from edge to edge, with a thin, tight crust.
The secondary benefit: the low-temperature phase dries the surface of the steak. The Maillard reaction (the browning that creates crust flavor) requires a dry surface. A steak coming out of a 250°F oven has a significantly drier surface than a steak coming straight from the fridge. The sear works faster, works better, and requires less time over damaging heat.
Equipment and Setup
An instant-read or leave-in probe thermometer is required. You're targeting 115°F in the oven phase (for medium-rare) — that's a precise number that you cannot eyeball or time your way to accurately. Without a thermometer, you'll overcook in the oven phase and have nothing left to work with in the sear.
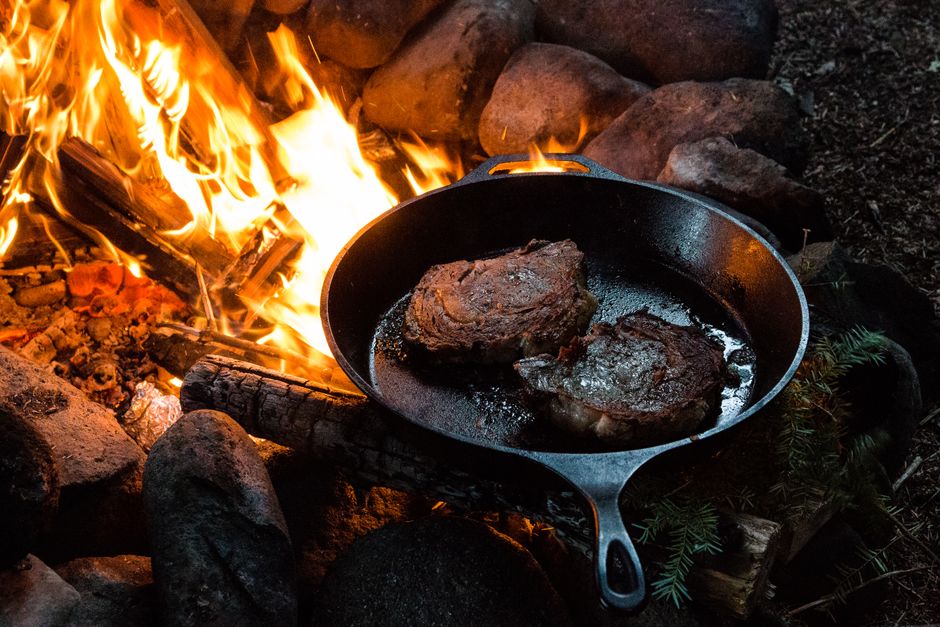
For the sear: a cast iron skillet, carbon steel pan, or high-BTU outdoor grill grate. The sear requires sustained high heat — at least 500°F surface temperature. A regular non-stick pan cannot get there. Cast iron holds heat through the steak better than stainless; it's the right tool for this application.
Wire rack on a sheet pan for the oven phase. Elevating the steak allows air circulation around all sides, which promotes even cooking. Placing directly on a sheet pan creates a hot spot on the bottom side.
Best cuts for reverse sear: any steak 1.5 inches or thicker. The technique shines most on ribeye, NY strip, tomahawk, and T-bone. Thin steaks (under 1 inch) go through the temperature range too quickly for the low-temp phase to be useful — just cook those conventionally.
Temperature Milestones
| Stage | Target Temp (Center) | What You're Watching For |
|---|---|---|
| Start of oven phase | Room temp (65–72°F) | Seasoned, dry surface, on wire rack |
| During oven phase | Rising slowly toward 115°F | Surface drying, even heating throughout |
| Pull from oven | 115°F (MR) / 125°F (M) / 135°F (MW) | Center temp confirmed with thermometer |
| Rest before sear | Stable or slight drop | Surface drying further; pan heating |
| Start of sear | ~115°F (hasn't risen much in rest) | Pan/grill at 500°F+, smoking hot |
| End of sear | 125–130°F (center) | Crust formed on all sides, 45–60 sec per side |
| Post-sear rest | 130–135°F (with carryover) | 3–5 min rest, temperature stabilizes |
Step-by-Step Process
Step 1: Season and Dry the Surface
Season the steak liberally with salt (and pepper, if desired) at least 45 minutes before cooking, or ideally the night before. The salt draws out moisture initially, then the meat reabsorbs it, seasoning the interior. Overnight dry brining in the refrigerator uncovered produces an exceptionally dry surface — ideal for the sear. Pat dry with paper towels immediately before going in the oven.
Step 2: Set Up the Oven or Grill at 250°F
250–275°F is the target. Lower temperatures give you more time and a shallower gradient, but the process becomes impractically slow below 225°F. Higher temperatures (above 300°F) reduce the temperature gradient advantage. 250°F is the sweet spot for a 1.5–2 inch steak: 45–75 minutes to reach the pull temperature, with good surface drying throughout.
Step 3: Insert Probe and Monitor
A leave-in probe thermometer makes the oven phase hands-off. Set an alert at 10°F below your target pull temperature so you can begin heating your sear pan. For medium-rare (target pull 115°F), set alert at 105°F. Check the steak at the alert, not by time — timing varies significantly based on starting temperature and thickness.
Step 4: Pull at Your Target Temperature
Pull at 115°F for medium-rare, 125°F for medium, 135°F for medium-well. Move to a rack or cutting board. Begin preheating your cast iron skillet over maximum heat immediately. The goal: by the time the skillet is screaming hot (5–8 minutes on a standard burner), the steak has rested and dried further.
Step 5: Sear in Maximum-Heat Cast Iron
Add a high-smoke-point fat (avocado oil, clarified butter, beef tallow) to the hot pan. When it shimmers, add the steak. Don't move it for 45–60 seconds. Flip. 45–60 seconds on the other side. Sear the edges by holding the steak vertically with tongs. If using butter and aromatics (garlic, thyme), add them in the final 30 seconds of each side — they'll burn if added earlier in a screaming-hot pan.
Total sear time: 2–3 minutes. If you're searing for more than 3 minutes, your pan isn't hot enough and you're continuing to cook the interior rather than just developing the crust.
Step 6: Rest 3–5 Minutes, Then Slice
The sear adds minimal carryover compared to high-heat cooking — expect 3–5°F of rise. Rest 3–5 minutes. Slice against the grain. The cross-section should show consistent medium-rare from edge to edge with a thin, tight crust and essentially no gray ring.
The Rest-and-Sear: Timing It Right
The rest period between the oven phase and the sear is often misunderstood. Its purpose is not juice redistribution (that happens after the final sear). It's about two things: letting the pan get properly hot, and allowing the surface temperature of the steak to drop slightly and dry out further.
A steak coming out of a 250°F oven has a surface temperature around 230–240°F. If you put it in a 500°F pan immediately, you get some steaming effect from the moist surface layers. A 5–8 minute rest drops the surface temperature and increases surface dryness — the sear is drier, hotter, and faster. The Maillard reaction happens more efficiently. That's not snobbishness — it's chemistry.
Don't let the steak rest longer than 10 minutes before the sear. The center temperature will start dropping toward 100°F, and you'll need more sear time to compensate, which reintroduces the problem you were trying to avoid.
Common Mistakes
Using steaks under 1.5 inches thick. A 1-inch steak passes through the 115°F oven target in 20–25 minutes — not enough time for meaningful surface drying or gradient equalization. The technique doesn't provide its full advantage below 1.5 inches. Save the reverse sear for thicker cuts and cook thin steaks conventionally.
Not getting the sear pan hot enough. A lukewarm cast iron produces a gray, slowly developing sear that continues cooking the interior. You need 500°F+ surface temperature — the pan should be smoking before the steak goes in. If you have a laser thermometer, check it. If not, a drop of water should explode instantly on contact.
Skipping the overnight dry brine. Salt applied 10 minutes before cooking sits on the surface and draws out moisture. Salt applied 45 minutes before is reabsorbed. Salt applied overnight produces a very dry surface and interior seasoning. The overnight dry brine is worth the planning; it makes the sear work faster and better.
Pulling at a higher oven temperature than 115°F. If you pull at 125°F from the oven and then add another 10°F from the sear, you're finishing at 135°F — medium, not medium-rare. The oven phase pull temperature must account for the temperature that the sear adds. 115°F oven pull + 10–12°F from sear = 125–127°F final = medium-rare. Get the math right before you start.
Long resting before sear. Resting too long after the oven phase before searing drops center temperature significantly. The steak may need more sear time to reheat the center, which defeats the purpose. Keep the rest-to-sear window at 5–10 minutes maximum.

Variations and Advanced Techniques
Reverse sear on a grill. Set up a two-zone fire: indirect heat on one side at 250°F, hot sear zone on the other. Cook the steak indirect to 115°F, then move to the hot side for the sear. The grill adds smoke flavor to the low-temp phase — something the oven doesn't provide. The sear on a hot charcoal or gas grill produces slightly more char and smoke than cast iron, which some cooks prefer.
Finishing in butter (basting). After the initial sear, reduce heat to medium, add 2 tablespoons of butter, crushed garlic, and fresh thyme. Tilt the pan and spoon hot butter over the steak continuously for the final 30–45 seconds. This adds flavor compounds from the herbs and butter, and produces a more complex crust than oil alone. Add butter after the high-heat phase — it burns at temperatures above 300°F.
Reverse sear for prime rib. The same principle scales to a whole ribeye roast. Oven at 250°F to 115°F internal, rest 15 minutes, blast at 500°F for 15 minutes for the exterior crust. The result is consistent medium-rare throughout a 6–8 lb roast — something nearly impossible with traditional high-heat roasting. Use a leave-in probe and the roast timing guide for planning your window.
FAQ
What temperature should I pull steak for reverse sear?
Pull from the oven at 115°F for medium-rare (final: 128–132°F after sear). Pull at 125°F for medium (final: 138–142°F). Pull at 135°F for medium-well (final: 148–152°F). These targets account for approximately 12–15°F of temperature gain from the sear. If your sear is shorter or longer, adjust accordingly.
Can I use a regular oven for reverse sear?
Yes — that's the standard method. Set the oven to 250°F, place the steak on a wire rack over a sheet pan, insert a probe thermometer, and wait. No special equipment required beyond a thermometer and wire rack. The grill is an alternative that adds smoke flavor, not a requirement.
How long does reverse sear take?
For a 1.5-inch steak at 250°F: 45–60 minutes to reach 115°F. For a 2-inch steak: 60–90 minutes. Add 5–10 minutes for the pre-sear rest and 3–5 minutes for the sear itself. Plan for 75–105 minutes total for a thick steak. This is not a quick weeknight method — it's a weekend or occasion method.
Does reverse sear work for other cuts besides steak?
Yes. Thick pork chops (1.5 inches+), lamb chops, and chicken breasts all benefit from the same principle. For chicken breasts, the oven temperature drops to 225°F and the pull temperature is 155°F (before sear adds to 165°F final). The technique's advantage — even temperature distribution through a thick cut — applies to any protein.
Is a thermometer required for reverse sear?
Yes. The oven pull temperature of 115°F is a precise target that cannot be reliably hit without a thermometer. Timing alone varies by starting temperature, thickness, oven calibration, and steak density. A thermometer eliminates all that variability. This is not a technique to attempt by feel.
Why is my sear crust not forming properly?
Three possible causes: the pan wasn't hot enough (needs 500°F+), the steak surface was still too moist (rest longer before searing), or you're moving the steak before the crust sets (leave it untouched for 45–60 seconds before checking). A steak that won't release from a well-seasoned cast iron pan is not done searing on that side yet. Wait.
Recommended by Titan Grillers
IP67 Waterproof Digital Meat Thermometer
Reads in 2–3 seconds · Backlit LCD · Built-in magnet · Free returns
Free BBQ Calculators
Use our free tools to nail your cook times, temperatures, and quantities every time.
You Might Also Like


Join the Grill Masters Club
Get exclusive recipes, techniques and special offers on our premium meat thermometers.