How to Season and Preheat Your Grill for Consistent Temperatures
This comprehensive guide explains the importance of properly seasoning and preheating your grill for consistent cooking temperatures. It covers seasoning techniques for different grill types, detailed preheating methods, temperature zone management, troubleshooting tips, and seasonal considerations. The article naturally incorporates information about how a quality thermometer can help monitor grill temperatures while providing value-focused content for both beginner and experienced grillers.

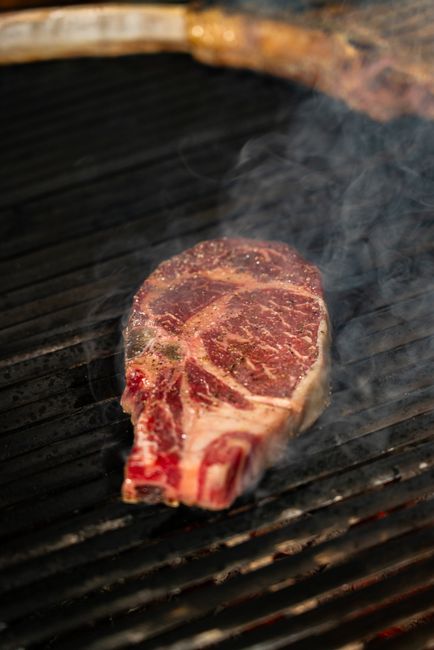
Preheating your grill is not optional. Cold grates mean food sticks, uneven cooking, and steaming instead of searing. A 10–15 minute preheat on a gas grill and a 20–25 minute wait on charcoal are what separates consistent results from inconsistent ones. Here's exactly how to do it.
Why Preheating Matters
It prevents sticking. Cold protein on cold grates bonds to the metal surface. Hot grates (400°F+) cause immediate surface moisture evaporation and sear formation — the crust that naturally releases from the metal. This is why "it sticks" is almost always a preheat problem, not a greasing problem.
It sears instead of steams. Adding food to a grill that's still heating up means your food sits in a cooling, moisture-laden environment until the grill recovers. Result: gray, steamed exterior instead of browned crust. The Maillard reaction that creates browning requires surface temperatures above 280°F — and you want to hit that immediately, not after 5 minutes of gradual heating.
It makes cook times predictable. A fully preheated grill at a known temperature means your 12-minute chicken breast is actually 12 minutes. An underpreheated grill at an unknown temperature means every cook is a new estimate.
How to Season Your Grill Grates
Seasoning creates a non-stick layer on the grates through polymerization of oil — the same process as seasoning cast iron. It's different from preheating but related: both require heat.
For New Grates or After Deep Cleaning
Clean the grates with a brush. Apply a thin layer of high-smoke-point oil (vegetable, canola, or flaxseed — avoid olive oil, which smokes at too low a temperature for grate seasoning). Heat the grill to medium-high (400–450°F) for 30 minutes. The oil polymerizes and bonds to the grate surface. Wipe with a dry cloth and let cool. Repeat 2–3 times for a new grate.
For Routine Maintenance
After every cook: brush the hot grates while they're still hot, then turn the grill off and let it cool. Before the next cook: brush again during preheat to remove any residue from the previous session. Lightly oil the grates with a folded paper towel dipped in oil just before adding food — not before the preheat.
Oils That Work Well
| Oil | Smoke Point | Good For Seasoning |
|---|---|---|
| Vegetable oil | 400–450°F | Yes — cheap and works well |
| Canola oil | 400–450°F | Yes — most common choice |
| Flaxseed oil | 225°F | Yes — best polymerization, but expensive |
| Olive oil | 375–405°F | Marginal — smokes too early at grill temps |
| Avocado oil | 520°F | Yes — handles high-heat seasoning well |
Preheating by Grill Type
Gas Grill
Turn all burners to high. Close the lid. Wait 10–15 minutes. Check grate temperature with an IR thermometer — target 400–500°F for most cooking, 500–550°F for searing. Your grill's lid thermometer will read 100–150°F lower than the grate surface. Don't trust it.
After preheat: brush the grates clean, oil lightly, then add food. Turn to cooking temperature at this point — you don't necessarily cook everything at max heat, but you preheat at max.
Charcoal Grill
Light the chimney. Use a full chimney (about 100 briquettes) for high-heat cooking, half a chimney for medium heat. Wait until the top coals are ashed over — roughly 15–20 minutes. Pour coals into your desired configuration. Install cooking grates. Wait 5 minutes for grates to heat. Total preheat: 20–25 minutes.
Don't rush this. Charcoal that isn't fully lit produces acrid, dirty smoke. Properly lit charcoal produces clean heat and minimal smoke.
Pellet Grill
Set to your target temperature. Close the lid. Wait for the controller to signal "ready" — usually 10–15 minutes. The built-in probe on most pellet grills reads near the grate and is more reliable than the probes on gas grills. Still, verify with your own thermometer the first few times to confirm what "ready" actually means in terms of real grate temperature.
Target Temperatures for Different Foods
| Food | Grate Temp (Direct) | Grate Temp (Indirect) |
|---|---|---|
| Burgers | 375–425°F | — |
| Steak (sear) | 450–550°F | 300–325°F (finish) |
| Chicken breast | 375–400°F | 300–325°F (finish) |
| Bone-in chicken | 400°F (initial sear) | 325–350°F (finish) |
| Vegetables | 375–425°F | — |
| Fish (delicate) | 350–400°F | — |
| Pizza | 500–600°F | — |
Step-by-Step Preheat and Season Routine
Step 1: Start with Clean Grates
Brush residue from the previous cook off the cold grates before firing up. Cold brushing is easier on the grate surface than hot brushing, and removes the bulk of residue.
Step 2: Fire Up at Max Heat
All burners on high (gas), or full chimney lit (charcoal). Close the lid. Start the timer — 10 minutes for gas, 20 minutes for charcoal.
Step 3: Verify with a Thermometer
Don't trust the lid gauge. Use an infrared thermometer to verify the grate surface is at your target temperature. Different areas of the grate may be at different temperatures — especially on charcoal — so check multiple spots.
Step 4: Brush the Hot Grates
A quick pass with a grill brush on the hot grates cleans any remaining residue and lifts anything the cold brush missed. Residue burns off and brushes away cleanly at cooking temperature.
Step 5: Oil and Add Food
Fold a paper towel into a small pad, dip in vegetable or canola oil, and wipe the grates using tongs. Immediately add food. Don't let the oil sit on hot grates — it just burns off and smokes.
Common Mistakes
Not waiting long enough. The most common. "I turned it on and waited 5 minutes" — on a gas grill, grates need 10–15 minutes to fully heat through. On charcoal, 20–25 minutes minimum. Checking with a thermometer instead of a timer is more reliable.
Oiling the grates before preheating. Oil applied to a cold grate smokes and burns off during preheat, contributing nothing to non-stick. Oil the grates after preheat, right before food goes on.
Using cooking spray (PAM) on hot grates. Cooking spray is flammable. On a hot grill, it can cause a flash flare-up. Use a paper towel with cooking oil instead.
Trusting the lid thermometer for cooking temperature. Covered in earlier sections — the lid gauge reads air temp, not grate temp. If you're adjusting your cooking based on the lid gauge, you're working with the wrong number.
Skipping preheat on a charcoal grill because "the coals are lit." Lit coals and ready-to-cook coals are different. You need fully ashed-over coals pouring steady, even heat. Coals just lit from the chimney are still producing variable heat and acrid smoke.

Maintaining Consistent Temperature
Getting to the right temperature is step one. Holding it throughout the cook is step two.
On gas: Closing the lid is the main tool. Every 30-second lid opening drops grill temperature 75–100°F. For a 20-minute chicken breast, that's 3–4 temperature drops if you open every 5 minutes.
On charcoal: The intake vent controls airflow and temperature. More open = more air = higher temperature. Close the intake partially to drop temperature, open to raise. The exhaust vent should stay fully open — it's not a temperature control mechanism. Closing the exhaust traps smoke and creates bitter off-flavors.
Watch for temperature drop after adding cold food. A large cold chicken breast or 6 burgers at 35°F will drop your grill temperature 25–50°F immediately. Expect it and account for slightly longer cook times after a large load. Grate temperature will recover as the food heats up.
Always verify doneness with an internal temperature check — chicken temperature guide for poultry and the targets above for other meats. Getting the grill to the right temperature is how you cook; the thermometer is how you know when you're done.
FAQ
- How long should I preheat my grill before cooking?
- Gas grill: 10–15 minutes on high heat, lid closed. Charcoal grill: 20–25 minutes after lighting (wait until coals are fully ashed over). Pellet grill: 10–15 minutes until the controller signals ready. Verify with an IR thermometer at the grate surface — don't rely on lid gauges.
- How do I season new grill grates?
- Apply a thin layer of high-smoke-point oil (canola, vegetable, or avocado) to clean grates. Heat the grill to 400–450°F for 30 minutes. Let cool. Repeat 2–3 times for new grates. For ongoing maintenance, brush hot grates after each cook and oil lightly right before adding food.
- What temperature should my grill be for steaks?
- 450–550°F at the grate surface for the searing phase. After the sear, move to indirect zone at 300–325°F to reach your target internal temperature. Measure grate temperature with an IR thermometer — your lid gauge will read 100–150°F lower than actual grate temperature.
- Why does food stick to my grill grates?
- Usually insufficient preheat. Cold protein bonds to metal; hot grates cause immediate surface searing that releases naturally. Make sure grates are at 400°F+ before adding food. Also oil the food or grates right before adding food (not during preheat, when the oil just burns off).
- Can I use olive oil to season grill grates?
- Not ideal. Olive oil has a smoke point of 375–405°F — at typical grill temperatures, it smokes heavily and can impart off-flavors. Canola oil (400–450°F) or avocado oil (520°F) work better for the seasoning process.
- How do I control temperature on a charcoal grill?
- Temperature control on charcoal is through the intake (bottom) vent — open fully for high heat, close partially to reduce temperature. The exhaust (top) vent should stay fully open during cooking; closing it traps smoke and creates bitter flavor. Bank coals to one side for two-zone setup.
Recommended by Titan Grillers
IP67 Waterproof Digital Meat Thermometer
Reads in 2–3 seconds · Backlit LCD · Built-in magnet · Free returns
Free BBQ Calculators
Use our free tools to nail your cook times, temperatures, and quantities every time.
You Might Also Like


Join the Grill Masters Club
Get exclusive recipes, techniques and special offers on our premium meat thermometers.