The Impact of Meat Thickness on Cooking Temperature and Time: A Complete Guide
This comprehensive blog post explores how meat thickness affects cooking temperature and time, providing detailed guidelines for different cuts and thicknesses. It includes scientific explanations of heat transfer, practical cooking times for various thicknesses, common mistakes to avoid, and advanced techniques like reverse searing. The post naturally integrates the TITAN GRILLERS meat thermometer as an essential tool for achieving perfect results.
A 1/2-inch steak and a 2-inch steak are not the same cook with a longer timer. Thickness doesn't just change how long a cut takes — it changes what approach works entirely. Here's the physics, and what to do about it.
The Problem Thickness Creates
Every piece of meat has a temperature gradient during cooking: hot on the outside, cooler toward the center. The thicker the cut, the steeper that gradient, and the harder it becomes to cook the outside and inside simultaneously.
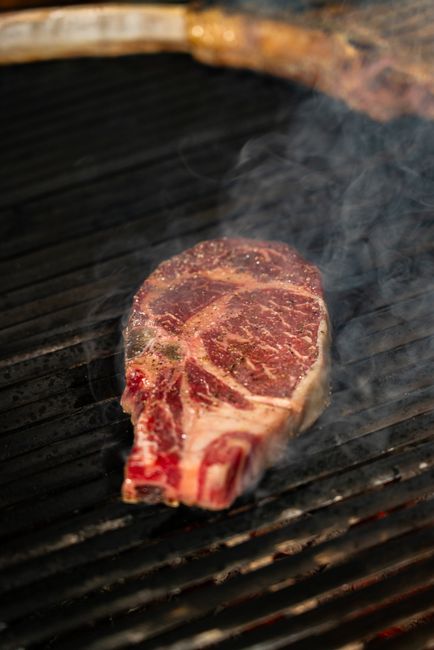
A 1/2-inch steak cooked on a 500°F grill: by the time the center reaches 130°F, the outer 1/4 inch is at 160–170°F — acceptably overdone, just a thin gray band. Cook a 2-inch steak the same way, and the outer 1/2 inch reaches 160–180°F before the center hits 130°F. That's a thick gray band on a premium piece of meat.
The solution is not patience. It's changing your cooking approach based on thickness.
The Science: Why Thickness Changes Everything
Heat travels through meat by conduction — it moves from the hot exterior toward the cooler center, molecule by molecule. The rate of heat transfer is proportional to the temperature difference (higher surface temp = faster transfer) but also limited by the distance the heat has to travel.
For a 1/2-inch steak, heat needs to travel 1/4 inch to reach center. For a 2-inch steak, it needs to travel 1 inch — 4 times the distance. But because heat diffusion is proportional to the square of the distance, the 2-inch steak actually takes roughly 16 times longer than the 1/2-inch steak to reach the same internal temperature under identical conditions. That's not a typo.
This is why time-based recipes don't work reliably. They're written for a specific thickness that may not match what you bought.
Equipment and Setup
For variable thickness cooking, you need:
- Instant-read thermometer — ±1°F, under 5 seconds. Non-negotiable for checking at multiple points during the cook.
- Two-zone grill setup — direct high heat for searing, indirect zone for slow cooking thick cuts. See setup by grill type in the temperature zones guide.
- Leave-in probe (optional but useful) — for cuts over 1.5 inches, a wireless probe lets you monitor without opening the grill repeatedly.
- Ruler or calipers — measure your cut before cooking so you know which approach to use. A 1.8-inch steak and a 1.3-inch steak are not the same cook.
Temperature Milestones by Thickness
| Cut Thickness | Approach | Initial Grill Zone | Carryover | Approximate Time |
|---|---|---|---|---|
| Under 3/4" | Direct high heat only | 450–550°F | 3–5°F | 3–5 min total |
| 3/4" – 1.25" | Direct medium-high | 400–450°F | 5–7°F | 6–10 min total |
| 1.25" – 2" | Reverse sear or sear-rest-finish | Indirect 225–275°F then 500°F | 5–8°F | 25–50 min total |
| Over 2" (tomahawk, etc.) | Reverse sear essential | Indirect 225–250°F then 500°F+ | 8–12°F | 45–90 min total |
| Roasts 2–4 lbs | Indirect throughout | 325–375°F | 8–12°F | 1.5–3 hours |
| Brisket / pork shoulder | Low and slow indirect | 225–275°F | 2–5°F at these temps | 8–16+ hours |
Step-by-Step by Cut Thickness
Thin Cuts (Under 3/4 inch): Direct High Heat
Preheat grill to 450–550°F at grate level. Pat meat dry — surface moisture steams instead of sears, slowing crust development. Cook 2–3 minutes per side over direct heat. Check temperature at 4–5 minutes total. Pull at 5°F before target (for medium-rare steak: pull at 125–128°F). Rest 3–4 minutes.
The risk here: thin cuts can overcook in under a minute. Once you're within 10°F of target, check every 30–45 seconds.
Medium Cuts (3/4 – 1.25 inch): Direct Medium-High
The "standard" steak range. Preheat to 400–450°F. Sear 3–4 minutes per side. Check at 6–8 minutes total. Pull at 5–7°F before target. Rest 4–5 minutes. A leave-in probe on the second side makes this easier — you can watch the number climb in real time.
Thick Cuts (1.25 – 2+ inch): Reverse Sear
Set up two zones: indirect at 225–250°F, and direct at 500°F+. Start the steak in the indirect zone. Insert a leave-in probe or check with instant-read every 10–15 minutes. When internal temperature reaches 115–120°F (for medium-rare target of 130–135°F), move to direct high heat for 60–90 seconds per side. The exterior was never exposed to high heat before this point — no gray band, no overcooked edge. Pull when surface has a crust and internal is 125–128°F. Carryover finishes it.
The Gradient Problem and How to Fix It

The gray ring around a steak cross-section is the overcooked zone — the band of meat that spent too long above its target temperature while the center was still heating up. On a 1-inch steak cooked at 500°F, that gray ring might be 1/4 inch thick. On a 2-inch steak cooked the same way, it's 1/2 inch or more. On a $60 tomahawk ribeye, that's a problem worth solving.
Three techniques that reduce the gray ring:
- Reverse sear — the most effective. Slow indirect heat first brings the whole cut to an even temperature. The temperature gradient is minimal by the time searing starts. Final sear creates crust without overcooking the edges.
- Sous vide + sear — not a grill technique, but the most extreme version of the same principle. Entire steak brought to exact target temp in water bath, then 60–90 seconds of screaming hot sear for crust only. Zero gray ring.
- Sear-rest-finish — sear hot on both sides to form crust, rest the steak off heat for 5 minutes to let exterior heat dissipate, finish in indirect heat to bring center up. Works but requires more active management than reverse sear.
Common Mistakes
Using Time Instead of Temperature
A recipe that says "5 minutes per side" was written for a specific cut thickness, a specific grill, and a specific starting temperature. None of those match your situation exactly. Use temperature as your primary indicator, time as a rough guide for when to start checking.
Same Technique for All Thicknesses
Direct high heat works beautifully on a 1/2-inch skirt steak. On a 2-inch ribeye, the same technique produces a steak with a 1/2-inch gray ring all around and a bloody center. The technique must match the thickness.
Not Preheating the Grill Long Enough
Searing a thick steak requires 500°F+ grate temperature. A gas grill takes 15 minutes to reach this. A charcoal grill takes 20–25 minutes after lighting. Putting a steak on a 350°F grill that's "still heating up" gets you poor crust development and an inaccurate cook.
Probe Placement on Thick Cuts
On a 2-inch ribeye, inserting the probe 3/4 inch deep gives you the mid-zone temperature — which can be 15–20°F above the true center. Insert far enough that the probe tip is at the geometric center of the cut. For a 2-inch thick, 4-inch wide steak: the probe tip needs to be 1 inch deep from the side, at center width.
Skipping the Rest on Thick Cuts
Carryover cooking on a 2-inch steak is 8–12°F. Skipping the rest means you're eating meat that's still actively cooking — the center is still rising while you're cutting. Rest 5–7 minutes for 1.5–2 inch cuts, 8–10 minutes for larger pieces.
Variations and Advanced Techniques
Dry-aging thin cuts differently. Dry-aged beef has reduced moisture — which means less cooling effect during cooking and faster interior heating. A 1-inch dry-aged steak cooks faster than a 1-inch fresh steak. Reduce your timing by about 15–20% on dry-aged cuts, and check temperature earlier.
Frozen steak method. Controversial but effective for thick cuts: cook the steak directly from frozen on a very hot grill. The frozen interior slows heat penetration naturally, giving you more time to develop the crust before the interior overcooks. Pull 10°F before your target and rest fully. This works best on cuts over 1.5 inches.
Butterflying thick cuts. If you have a 2-inch thick pork loin but don't want to do a reverse sear, butterfly it to 1-inch thickness and cook direct. Faster, more even — but you lose the dramatic presentation of the thick cut. A reasonable tradeoff for weeknight cooking.
For brisket timing — an extreme case of thickness management — the brisket cook time calculator handles the math. For pork shoulder at various weights, see the pork shoulder cook time calculator. Safe temperature baselines are at USDA food safety guidelines.
FAQ
How does meat thickness affect cooking time?
Heat has to travel farther to reach the center of a thick cut. Because heat diffusion scales with the square of distance, doubling the thickness roughly quadruples the time needed to bring the center to temperature — not doubles it. A 2-inch steak doesn't take twice as long as a 1-inch steak; it takes significantly more. This is why time-based recipes only work reliably for one specific cut thickness.
What is the reverse sear method and when should I use it?
Reverse sear starts the steak in low indirect heat (225–250°F) until 10–15°F below the target internal temperature, then finishes with a quick 60–90 second per side sear over very high heat (500°F+). Use it for any cut over 1.25 inches thick. The benefit: even internal temperature with a minimal gray band, because the entire steak comes up to near-target temperature before the sear starts.
At what thickness should I switch from direct to indirect cooking?
The transition point is around 1.25 inches. Below that, direct medium-high heat cooks through without excessive gray banding. Above 1.25 inches, the direct-only method produces noticeable overcooking at the edges before the center reaches target. That's when reverse sear or other indirect-first approaches become worthwhile.
Why does a thick steak have a gray ring when I cut into it?
The gray ring is meat that was above 150–160°F for too long while the center was still heating up. It's the overcooked zone created by the temperature gradient. The only reliable way to minimize it is with a reverse sear or sous vide approach that limits the time the exterior spends above target temperature.
Does higher grill temperature cook a thick steak faster?
The exterior cooks faster, but the center doesn't necessarily follow. A very high heat on a thick cut burns the outside before heat can penetrate to the center. For thick cuts, moderate indirect heat for most of the cook is more effective than cranking the temperature. Save the high heat for the final sear.
Should I let a thick steak come to room temperature before cooking?
For direct-heat cooking, it helps slightly — a room-temperature steak has less of a temperature gradient to overcome. For reverse sear, it doesn't matter much because the low indirect heat phase handles it. Don't leave meat at room temperature for more than 2 hours (USDA recommendation). For practical purposes, 30–45 minutes on the counter before a direct-heat cook is fine and marginally helpful.
Recommended by Titan Grillers
IP67 Waterproof Digital Meat Thermometer
Reads in 2–3 seconds · Backlit LCD · Built-in magnet · Free returns
Free BBQ Calculators
Use our free tools to nail your cook times, temperatures, and quantities every time.
You Might Also Like


Join the Grill Masters Club
Get exclusive recipes, techniques and special offers on our premium meat thermometers.